[[{“value”:”
Hey AI Breakers 👋
ChatGPT has a new Work mode: instead of helping you do the work, it does the work FOR you. You describe the outcome, it plans the project and hands you a finished deliverable.
Today: the complete tour, step by step. No coding needed.
✅ What Work mode actually is (and what happened to Agent mode)
✅ How to turn it on and pick the right tool for the job
✅ What you’ll see while it works: plans, sub-agents, live previews
✅ How to connect your apps, schedule recurring work, and manage the usage meter
Let’s dive in 👇

🧠 What ChatGPT Work Actually Is
OpenAI launched ChatGPT Work in July 2026 alongside the GPT-5.6 model family, and it quietly retired the old Agent mode at the same time. Work is its successor, and it’s a much bigger idea.
Regular ChatGPT (now just “Chat”) answers you. Work completes things. You give it a goal, and it:
-
📋 Breaks the goal into a multi-step plan you can watch (and approve) as it runs
-
🤖 Executes the steps itself: researching, browsing, writing, building, sometimes splitting the job across sub-agents that run in parallel
-
📦 Hands you a finished deliverable: a document, a spreadsheet with working formulas, a slide deck, a report, or even a live hosted website
And here’s the underrated part: Work runs in OpenAI’s cloud, not on your machine. You can close the laptop, walk away, and the task keeps going. Long jobs can run for hours without you babysitting them.
One mental model before we start: Chat is a colleague you talk to. Work is a colleague you delegate to. The whole tutorial flows from that difference.
💳 What You Need
-
A paid ChatGPT plan. On web and mobile, Work requires Plus, Pro, Business, or Enterprise. The $20/month Plus tier is enough for everything in this tutorial. (The new desktop app gives Free accounts a limited taste, but the real experience is on paid plans.)
-
A browser. Nothing to install: it’s all at chatgpt.com. There’s also a rebuilt desktop app for Mac and Windows with extra powers we’ll cover at the end.
-
A heads-up on regions. Some pieces arrive late in Europe: notably, publishing a Sites website publicly wasn’t available in the EEA, Switzerland, or the UK at launch. If something in this tutorial isn’t in your menu yet, it’s rolling out: check back in a few weeks.
-
A heads-up on usage. Work is included in your plan, but it runs on a metered allowance (the same credit system Codex uses). Normal use is fine; an all-day building spree can hit the limit, and then you wait, or buy extra credits. We’ll cover how to keep an eye on it.
🔀 Step 1 → Turn It On
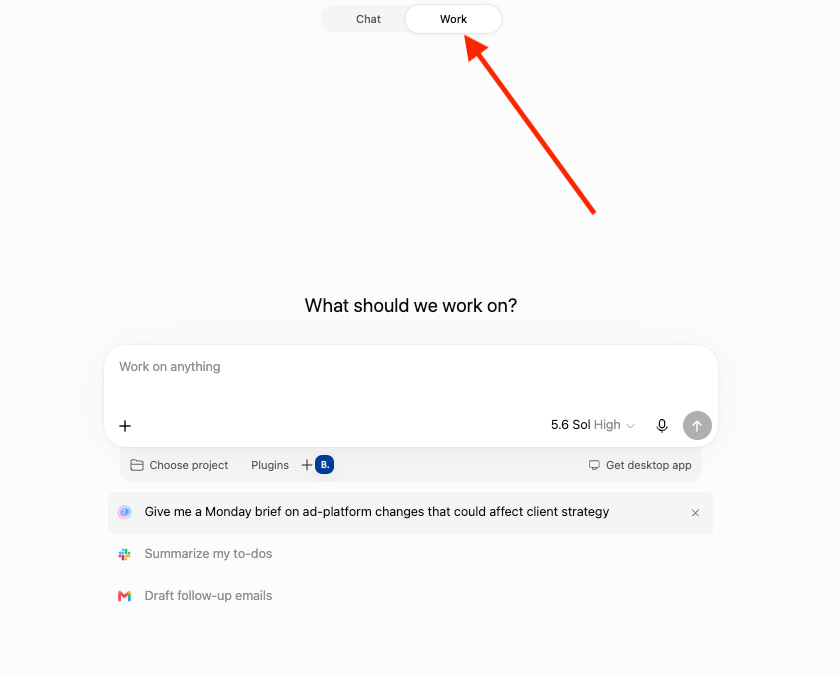
Go to chatgpt.com and look at the top of the screen. There’s now a switcher between Chat and Work:
-
Web: a toggle at the top of the page. Flip it to Work.
-
Mobile: a dropdown at the top of the screen. Select Work.
-
Desktop app: the rebuilt app has three modes: Chat, Work, and Codex (the developer one). Pick Work.
The screen will look almost identical to normal ChatGPT, with a new question in the composer: “What would you like to work on?” Don’t let the familiar look fool you: everything behind that box now behaves differently.
🧰 Step 2 → Know the Toolbox (and Always Pick the Tool Yourself)
Work produces different deliverable types with different built-in tools:
-
📄 Documents: proposals, plans, research briefs: structured and formatted
-
📊 Spreadsheets: with real formulas and summary tabs, not just tables of text
-
🖼️ Slides: decks built from an outline, meeting notes, or a rough brief
-
🌐 Sites (public beta): live, hosted, shareable websites and mini web apps: calculators, signup forms, dashboards, portals
-
🔎 Research: long multi-source investigations that come back as a cited report
Now the single most important habit in this entire tutorial: select the tool yourself before you hit send.
Work tries to pick the right tool from your wording, but it doesn’t always. Type “build me a website” with no tool selected and you might get a zip file or a raw HTML page instead of an actual hosted site. To remove all doubt:
-
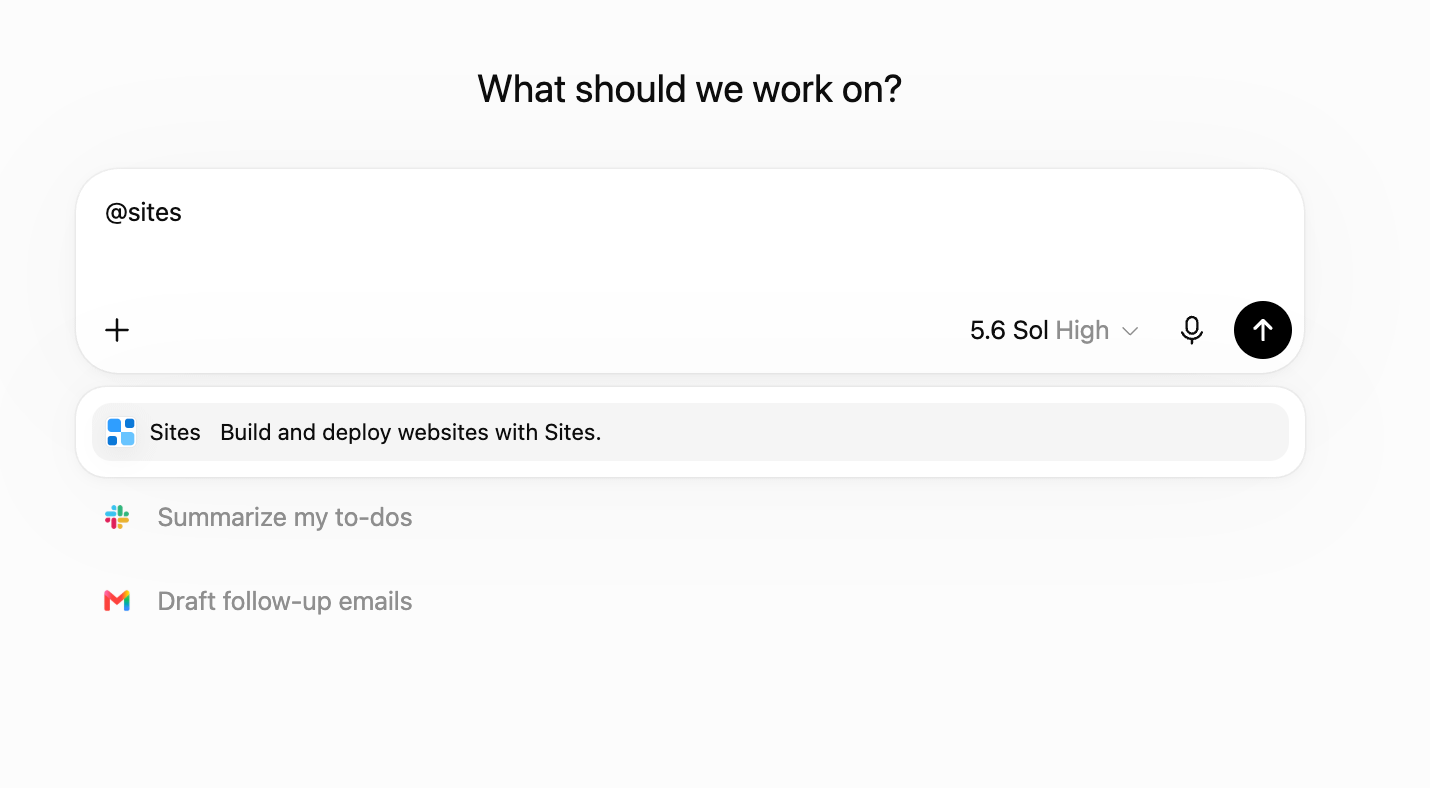
Click the + button in the message composer or type “@” in the chat bar
-
Pick the tool that matches your deliverable (e.g. type Sites for a website)
-
You’ll see it attached to your message: now it’s guaranteed to be used
💡 Bonus: type / in the composer to see the command menu. The useful ones for non-developers:
/plan(toggle step-by-step planning mode),/model(choose the model), and/reasoning(set the effort level).
🎛️ Step 3 → Set the Brainpower
Work runs on the GPT-5.6 model family, and before a big task it’s worth opening the model selector and making two choices:
-
Model: pick the strongest one your plan offers. Save the fast/light models for quick chats: a project build deserves the flagship.
-
Reasoning effort: crank it as high as your plan allows (higher tiers unlock higher settings). More effort means more thinking per step: slower, but dramatically better one-shot results.
The rule of thumb: for delegated work, choose quality over speed. You’re not sitting there waiting for a reply anyway: it’s working in the cloud while you do something else.
✍️ Step 4 → Give It Your First Job
Here’s where most people go wrong: they write a Work request like a chat message. One line, no context. In Work mode, the quality of your brief matters more than anything else, because the AI is about to make hundreds of small decisions without you.
A good Work brief has three parts: who you are, what you need (with must-haves), and what a great result looks like. Here’s a complete example you can adapt: select the Sites tool first, then send something like:
I'm Sam, and I run BrightSide Mobile Detailing: we bring professional car cleaning to people's driveways. My customers are busy professionals and families.

Build a website for my business. It needs:
- A homepage with a strong headline that instantly says what we do
- A services section: Express Wash, Full Interior Detail, Premium Full Detail, Ceramic Coating
- A "Get a Free Quote" form where visitors pick a service and send a request
- A short about section that makes us feel local and trustworthy

What a great result looks like: clean, sharp, trustworthy. Deep blue and white, modern, generous spacing. A visitor should find our services and request a quote within seconds.
The same three-part structure works for a deck (”I’m pitching a partner next Tuesday…”), a spreadsheet, or a report. Swap the tool, swap the details, keep the shape.
🧠 Tip: can’t put “what good looks like” into words? Attach screenshots of examples you admire and write “make it feel like these.” Work reads images.
👀 Step 5 → Watch It Work (Your New Favorite Screen)
Hit send, and this is where Work stops looking like a chatbot. A side panel opens, and you’ll see things ChatGPT has never shown you before:
-
📋 The plan. A multi-step roadmap built from your brief, updating live as steps complete. (Want to approve the plan before anything runs? That’s what
/planmode is for: it pauses for your sign-off first. Recommended for high-stakes jobs.) -
🤖 Sub-agents. For bigger tasks, Work spins up helpers: you might see a designer-type agent, a researcher, a checker: each handling a piece, sometimes in parallel, handing results to each other like a tiny team.
-
🖥️ The live preview. For sites and visual deliverables, a cloud browser shows the thing being built in real time. Click preview any time and poke around: it doesn’t interrupt the build.
-
✋ Permission checks. Before sensitive actions (sending, publishing, accessing an account), Work stops and asks. Read what it wants, then approve or decline. You stay in control of anything that touches the outside world.
A build takes minutes, not seconds: it’s writing copy, generating images, assembling the whole thing. Resist the urge to interrupt mid-plan with new ideas. Let version one finish.
And remember: it’s running in the cloud. Close the tab, get a coffee, check back. The work continues.
🔁 Step 6 → Review, Revise, and (Always) Verify
Version one will be genuinely impressive, and imperfect. The revision workflow is the same chat you’ve been in: you just talk the changes in.
-
Be surgical: “Make the header background darker blue” beats “improve the design”
-
Batch small: 2-3 changes per message, check the result, repeat. “Fix everything” requests cause regressions.
-
Use screenshots: screenshot the exact element, attach it, say “remove this” or “make this section look like the attached example.” Zero ambiguity.
-
Just complain: “the fonts feel cramped” works. Type it like you’d text a contractor and see what happens.
Now the part nobody tells you, and the most important paragraph in this tutorial: Work can be confidently wrong. It sometimes reports a task complete when a piece is unfinished, and a polished-but-wrong spreadsheet is more dangerous than a rough one, because the polish tempts you to skip the check. So before anything goes to a customer or your boss:
-
✅ Spot-check every number and formula in a spreadsheet
-
✅ Click every link in a report
-
✅ Test every form and button on a site (submit a test entry, confirm it lands, delete it)
-
✅ Better yet, make Work prove it: “Run a test submission through the form and show me the proof”
🔌 Step 7 → Plug In Your Apps
“}]] Read More in The AI Break